Receiving an Additional Development Request (ADR) from any Medicare Administrative Contractor (MAC) can induce anxiety, especially if it is the first time for a home health agency. However, receiving ADRs does not necessarily mean a mistake has been committed by the agency. It could merely be to verify that the claim meets Medicare payment guidelines.
It may be true that ADRs may result in claim denials, but the factors leading to this may also be attributed to how the agency handles ADR processing. In this article, we shall identify some ADR triggers, give tips on preparing, organizing, and submitting the requested records, and finally, an overview of the MAC’s review process.
Some ADR Triggers
- Physician face-to-face (F2F) encounter documentation DOES NOT meet the following Centers for Medicare & Medicaid Services (CMS) criteria:
- Sufficient clinical findings that prove a patient is homebound and requires skilled home health services
- F2F encounter occurred 90 days before Start of Care (SOC) or 30 days after SOC
- Legible physician signature with date
- The assigned primary diagnosis is not the focus of care and is not adequately supported by the face-to-face encounter.
- The OASIS Assessment does not show the patient is homebound.
- The plotted skilled services are not reasonable and medically necessary.
- There is insufficient or no physician order on treatment changes to support medical necessity.
- Multiple recertification periods have no sufficient documentation to prove continued skilled services are reasonable and medically necessary.
- Care documentation during home visit does not show collaboration among health providers and patient improvement (e.g. repetitive health teachings).
Preparing the Documentation
1. Check the FISS
As a biller’s best friend, the Fiscal Intermediary Standard System (FISS) lists all ADRs and their due dates. It is where the claim is moved when subjected to an ADR. Agencies are encouraged to check the FISS for ADRs at least once a week.
Using the FISS, you can identify the documentation that is being requested and the timeframe by which the documentation must be received. Specifically, this information is found on pages 7 and 8.
2. Insert the ADR Letter / Page
Add the ADR letter on top of the submitted medical records and attach a copy of the FISS page that specifies the requested documentation, as well as patient and claim details for easy reference.
3. Attach a Cover Letter
You may include an outline or cover letter, which will justify the care delivered by your agency. It should also provide a guideline as to what documentation is being submitted and how to easily find it. It should briefly summarize the patient’s needs, the skilled services provided to meet those needs, and the patient’s progress. The letter must be simple and easy to read.
Organizing the Documentation
1. Arrange chronologically according to the MAC’s checklist
All documents must be arranged in order of request following the MAC’s checklist for submission. This may include documentation prior to the review period, such as admission records, hospice Interdisciplinary Group (IDG) review, etc. The goal is to make the process as easy as possible for the reviewer by presenting the information in an organized and orderly manner. If there are multiple ADRs, documentation for each claim must be clearly separated.
2. Do not edit
Resist the urge to alter or correct any original documentation. The key is to explain and supplement your documentation with sufficient information to make your case stronger.
3. Include support documentation
Additional documentation which has not been requested may be provided to support payment of the claim. For instance, signed and dated physician certifications are strong pieces of evidence to establish the claim’s validity. On the other hand, do not make the mistake of overloading the reviewer with too much information.
4. Use special characters for emphasis
Using brackets, such as [ ] or { }, asterisks (*), or underlined text in the documentation will help draw the reviewer’s attention to important information.
- More dos and don’ts
- Insert page numbers and refer to them for more detail.
- Do not staple or bind the records.
- Do not attach sticky notes or tabs.
- Do not use a highlighter.
Submitting the Documentation
1. Check the calendar
With a 45-day window for a MAC to receive the documentation, you can plan ahead. Calculate the time you need to gather all documentation and be aware of the time it will take to arrive based on your preferred submission method.
2. Track your ADRs
Keep a running document with all ADRs listed. Include details of the date they were received, the date you sent the documentation back, the date the final determination is made, and what the outcome was. With so many specifics for each ADR, keeping track is a must. It is essential to have a copy of all documents submitted to the MAC, as well as proof of your submission.
The Review Process
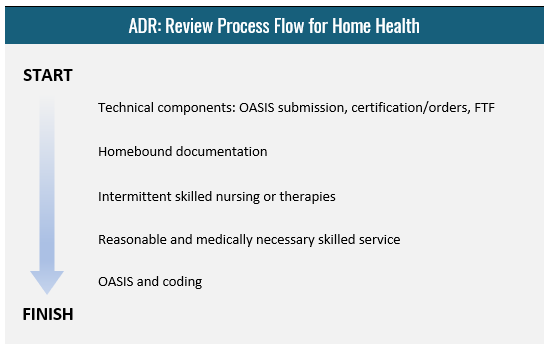
MACs use a process flow in the review of the documentation. This means that it is first reviewed for administrative documentation, and then for medical documentation.
Long-Term Lessons
If your agency is being hit with the same ADRs repeatedly, consider this as an opportunity to identify trends and improve upon them. Revisit your documentation process and address weak areas. Enhance how documentation is done at the clinician level to ensure thoroughness of the documentation.
One viable solution is to outsource your QA review to a specialized provider. The right outsourcing partner will not only ensure that your documentation is compliant, but will also help you monitor clinician charting performance for purposes of re-education and long-term process improvement.
Like with health, prevention is always better than cure. Therefore, getting things right from the get-go can save your agency a lot of hassle, time, energy, and money.
Resources:
CGS: Medical Review Additional Development Request (ADR) Process Review >
Palmetto: Responding to Home Health Additional Documentation Request (ADR) Checklist >


